HOLLOW / Reference archive

HOLLOW Roblox Skills: Requirements, Prices and Equipment

Last updated:

Find Strength, Speed, Kido and racial skills, check what they do, and prepare the stats and Yen you need. Use the Skill Shop to buy general skills, then check your hotbar before returning to combat.

26 objects

General and racial skill effects, stat requirements and listed prices

Diving Impale

Impala de Mergulho

Effect
Step forward with a thrust, staggering enemies in the path. The Portuguese description uses stun wording.
Strength required
5 STR (Both shop requirement sets.)
Speed required
—
Price
500 Yen (Skill Shop purchase price.)
Example key
—
Scaling
Strength
More details
Tier
1
Equipment examples
Hotbar slot 2 in several loadouts and slot 3 in a Portuguese-menu purchase example. (Hotbar arrangements, not fixed skill keys)
Scales with
Strength

Mountain Splitter

Divisor de Montanhas

Effect
Raise the sword and deliver a heavy slash that knocks enemies backward.
Strength required
10 STR (Shop requirement set with Fault Ripper at STR 15.)
20 STR (Shop requirement set with Fault Ripper at STR 55.)
Speed required
—
Price
1500 Yen (Skill Shop purchase price.)
Example key
—
Scaling
Strength
More details
Tier
2
Equipment examples
Hotbar slots 3 or 4 in different loadouts, and slot 7 in a playtest loadout.
Scales with
Strength

Fault Ripper

Destruidor de Falhas · Rasgador de Falhas

Effect
Strike enemies in front with a powerful sword attack. (Displayed description)
Strength required
15 STR (Shop requirement set with Mountain Splitter at STR 10.)
55 STR (Shop requirement set with Mountain Splitter at STR 20.)
Speed required
—
Price
3500 Yen (Shop with Mountain Splitter at STR 10.)
Example key
—
Scaling
Strength
More details
Tier
3
Equipment examples
Hotbar slots 5 or 6 in different loadouts, and slot 8 in a playtest loadout.
Scales with
Strength

Executioner's Arc

Executioners Arc · Arco do Executor · Arco do Carrasco

Effect
Strike enemies in front with a powerful sword attack. (Displayed description)
Strength required
15 STR (Shop requirement set with Mountain Splitter at STR 10.)
40 STR (Shop requirement set with Mountain Splitter at STR 20.)
Speed required
—
Price
3500 Yen (Listed price in the shop with Mountain Splitter at STR 10.)
Example key
—
Scaling
Strength
More details
Tier
3
Equipment examples
Hotbar slots 8 or 4 in different loadouts; owned copies have an EQUIP button in the shop.
Scales with
Strength

Blade Press

Prensa de Lâminas

Effect
Enter a sword stance and counter the first incoming attack.
Strength required
20 STR (Shop requirement set with Mountain Splitter at STR 10.)
Speed required
—
Price
7500 Yen (Listed price in the shop with Mountain Splitter at STR 10.)
Example key
—
Scaling
Strength
More details
Tier
4
Combat example
One Nozarashi playtest loadout used Blade Press in slot 6 to defeat a target in one use. (Target- and setup-specific playtest example.)
Scales with
Strength

Blink Cut

Corte de Piscar

Effect
Flash forward and slash enemies along the path.
Strength required
—
Speed required
5 SPD (Both shop requirement sets.)
Price
—
Example key
—
Scaling
Speed
More details
Tier
1
Role
Forward dash attack
Equipment examples
Hotbar slot 3 in melee loadout examples and slot 4 in a playtest loadout.
Scales with
Speed

Flower Frenzy

Loucura das Flores

Effect
Plant your feet in a sword stance and perform rapid successive slashes in front.
Strength required
—
Speed required
10 SPD (Shop requirement set with Mountain Splitter at STR 10.)
20 SPD (Shop requirement set with Mountain Splitter at STR 20.)
Price
—
Example key
—
Scaling
Speed
More details
Tier
2
Role
Rapid frontal slashes
Example hotbar slot
2 slot (Playtest loadout example.)
Scales with
Speed

Besiege

BESIEGE · Assediar

Effect
Rush upward, hover, then slash downward to send wind blades toward enemies ahead and below.
Strength required
—
Speed required
15 SPD (Shop requirement set with Mountain Splitter at STR 10.)
45 SPD (Shop requirement set with Mountain Splitter at STR 20.)
Price
—
Example key
—
Scaling
Speed
More details
Tier
3
Role
Airborne wind-blade attack
Equipment examples
Hotbar slot 7 in a PvP loadout and slot 5 in a playtest loadout.
Scales with
Speed

Utsusemi

UTSUSEMI

Effect
Flash Step away, leaving a shell that counters the first enemy attack. The Portuguese description describes the shell as blocking the first attack. (English and Portuguese shop wording)
Strength required
—
Speed required
40 SPD (Shop requirement set with Mountain Splitter at STR 10.)
80 SPD (Shop requirement set with Mountain Splitter at STR 20.)
Price
—
Example key
—
Scaling
Speed
More details
Tier
4
Role
Escape and counter
Equipment examples
Hotbar slot 5 in a PvP loadout and slot 3 in a playtest loadout.
Scales with
Speed

Kurohitsugi

Hadō #90

Effect
A purple-black pillar-shaped attack. (Level-100 playtest character)
Strength required
—
Speed required
—
Price
—
Example key
—
Scaling
—
More details
Hadō number
90 (Displayed casting text)
Example hotbar slot
2 slot (Level-100 playtest loadout)
Damage estimate
300 damage (Approximate value for one level-100 playtest setup)
Remaining cooldown example
19.4 seconds (Level-100 playtest character, after casting)

Byakurai

Effect
—
Strength required
—
Speed required
—
Price
—
Example key
—
Scaling
—
More details
Availability
Byakurai can be purchased in the playtest setup. (Playtest access)
Example hotbar slot
5 slot (Level-100 playtest loadout)

Raikōhō

Raikoho · Hadō #63: Raikōhō

Effect
A broad yellow lightning effect. (Level-100 playtest character)
Strength required
—
Speed required
—
Price
—
Example key
—
Scaling
—
More details
Hadō number
63 (Displayed casting text)
Example hotbar slot
4 slot (Level-100 playtest loadout)
Displayed hit counter
5 hits (One Raikōhō attack sequence against a CALAMITY Vasto Lorde)

Senju Koten Taiho

Effect
—
Strength required
—
Speed required
—
Price
—
Example key
—
Scaling
—
More details
Type
Kidō spell.
Example hotbar slot
3 slot (Level-100 playtest loadout)
Same spell as
Senju Koten Taiho

Senju Koten Taiho

Effect
—
Strength required
—
Speed required
—
Price
—
Example key
—
Scaling
—
More details
Test-menu availability
Available in the playtest ability menu. (Playtest access)

Shakkahō

Shakkaho

Effect
—
Strength required
—
Speed required
—
Price
—
Example key
—
Scaling
—
More details
Example hotbar slot
6 slot (Level-100 playtest loadout)
Test-menu availability
Also appears in the playtest skill dropdown. (Playtest access)

Cero

Zero

Effect
Fires an energy attack, with red or red-white energy in Hollow-form examples.
Strength required
—
Speed required
—
Price
—
Example key
R (Gillian, Adjuchas and Arrancar loadout examples)
T (Vasto Lorde loadouts and one winged-form loadout example.)
Scaling
—
More details
Role
Ranged energy attack
Resource behavior
Use is followed by a cooldown indicator and a decrease in the blue resource bar. (Gillian / Menos use.)
Observed remaining cooldown
4.8 seconds (One post-evolution attack; remaining cooldown example.)
Build feedback
An all-Strength setup can favor M1 over Cero. Consider Kido investment for a Cero-focused build. (Build-choice advice based on the stated allocations.)
Cover use
Repeated casts from building or pillar cover are used against the inner-world boss. (Inner-world boss fights with building or pillar cover.)
Shown on
Gillian (R slot)
Shown on
Adjuchas (R slot)
Shown on
Vasto Lorde (T slot in Vasto Lorde loadout examples.)
Retained by
Arrancar (R slot)

Rugido / Roar

Rugido · Roar

Effect
Knocks enemies back and creates a ring-shaped effect in an Adjuchas use example. (First Foe and post-evolution combat examples.)
Strength required
—
Speed required
—
Price
—
Example key
C (Early Hollow, Adjuchas and Vasto Lorde examples)
Scaling
—
More details
Role
Roar and knockback
Name context
Rugido is the Portuguese label for Roar.
Observed remaining cooldown
3.8 seconds (Early Hollow combat; remaining cooldown example.)
Observed remaining cooldown
3 seconds (Remaining cooldown example in a restricted area.)
Observed remaining cooldown
8 seconds (Post-evolution combat; remaining cooldown example.)

Ground Smash

Golpe no Chão

Effect
—
Strength required
—
Speed required
—
Price
—
Example key
V (Bulky Hollow and Adjuchas loadout examples.)
Scaling
—
More details
Role
Close-range area attack (Adjuchas loadout example.)
Combat use
Used against nearby grouped enemies, followed by Roar; enters cooldown after use. (One Adjuchas event fight.)
Follow-up attack example
Rugido / Roar (One Adjuchas event fight.)

Dash Rush

Effect
Rushes forward and enters cooldown. (Hollow and Adjuchas use examples.)
Strength required
—
Speed required
—
Price
—
Example key
V (Early Winged Hollow and Adjuchas loadout examples.)
Scaling
—
More details
Role
Forward rush

Bomba Grande

Big Bomb

Effect
Blue energy gathers into a large area explosion. (Vasto Lorde ultimate.)
Strength required
—
Speed required
—
Price
—
Example key
R
Scaling
—
More details
Role
Reiatsu-bomb ultimate
Ultimate meter before use
100 % (One activation with the skill lit and ready.)
Ultimate meter after use
0 % (Same activation example.)
Dim skill example
25 % (Partially filled ultimate meter; the skill is dim.)
Combat result
In one attack example, the Adjuchas is hit but survives the initial blast. (One attack against an Adjuchas.)
Shown on
Vasto Lorde (Vasto Lorde loadout examples.)

Hierro

Ferro

Effect
Activation creates a small shield and reduces incoming damage. A cyan circular effect and cooldown indicator accompany its use.
Strength required
—
Speed required
—
Price
—
Example key
T (Arrancar loadout examples with Hierro.)
Scaling
—
More details
Role
Damage reduction (While active.)
Shown on
Arrancar (Loadout examples with Hierro on T.)

Bala

Effect
—
Strength required
—
Speed required
—
Price
—
Example key
T (One Vasto Lorde-to-Arrancar conversion example.)
Scaling
—
More details
Role
Shooting attack
Observed availability
Appears alongside Cero immediately after conversion in this loadout example. (Same conversion example.)
Shown on
Arrancar (Post-conversion loadout example with Bala on T.)

High-Speed Regeneration

Effect
—
Strength required
—
Speed required
—
Price
—
Example key
T (Arrancar loadout examples with High-Speed Regeneration.)
Scaling
—
More details
Role
Rapid recovery
Observed availability
Available after conversion in an Arrancar loadout used for event and Raid combat.
Recovery observation
Rapid recovery during combat. (Arrancar combat example.)
Shown on
Arrancar (Loadout examples with High-Speed Regeneration on T.)

Embestida

Effect
—
Strength required
—
Speed required
—
Price
—
Example key
V
Scaling
—
More details
Role
V-slot attack example (Vasto Lorde loadout example)
Label context
The original label suggests a charge or rush. Example attack sequence: Cero → Roar → Embestida.
Shown on
Vasto Lorde

Empurrada

Effect
Used as a pushing attack; in one patrol example, the target dies after the attack and the patrol clears. (One patrol attack example)
Strength required
—
Speed required
—
Price
—
Example key
V
Scaling
—
More details
Role
Push attack (Vasto Lorde loadout example)
Shown on
Vasto Lorde

Descenso

Effect
—
Strength required
—
Speed required
—
Price
—
Example key
V
Scaling
—
More details
Role
Named racial skill-bar entry (Example loadout)
Label context
A descent-related label on the black winged form's bar, beside Big Bomb, Cero and Roar.
At a glance

Open SKILLS from the radial menu, choose a category, and meet the requirement shown beside your chosen skill. Select BUY, then EQUIP if it does not equip automatically. Diving Impale requires STR 5 and costs 500 Yen; Blink Cut requires SPD 5. Higher requirements differ between shop configurations, so use your current shop's values. Racial abilities and their keys also change with your form.

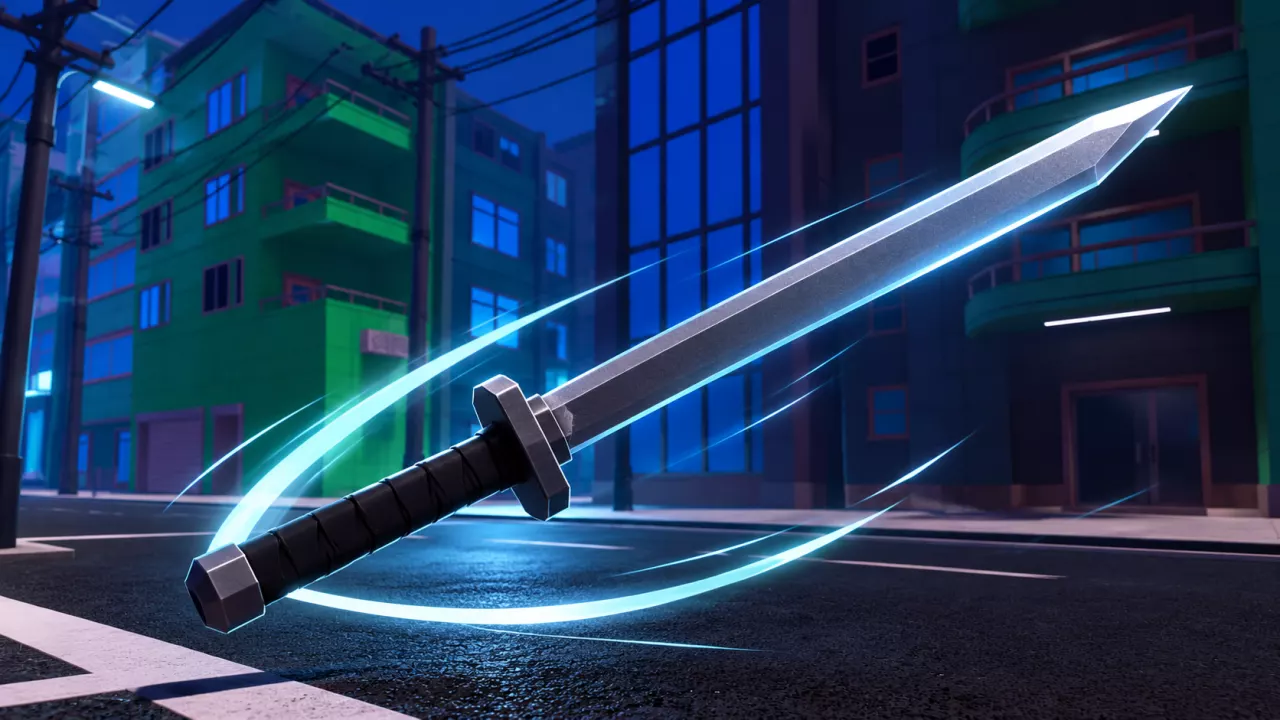
HOLLOW Roblox Skills: Requirements, Prices and Equipment — illustrated cover

Browse Skills, Requirements and Prices

The directory covers five Strength skills, four Speed skills, six Kido entries and eleven racial abilities. Search by name or alias, compare the listed attributes, and open More details for additional conditions.

Strength skills scale with Strength; Speed skills scale with Speed. Their roles help narrow your choice:

  • Strength: Diving Impale supplies a forward thrust with stagger, while Mountain Splitter adds a heavy knockback slash. Fault Ripper and Executioner's Arc attack enemies in front. Blade Press takes a counter stance against the first incoming attack.
  • Speed: Blink Cut closes distance with a slash. Flower Frenzy delivers repeated frontal slashes from a planted stance. Besiege attacks from above with wind blades. Utsusemi provides an escape that leaves a protective counter shell.

Match requirements to your shop

Use the requirement set that matches the list in your game. One configuration places Mountain Splitter at STR 10, Fault Ripper and Executioner's Arc at STR 15, and Blade Press at STR 20. Another places Mountain Splitter at STR 20, Fault Ripper at STR 55, and Executioner's Arc at STR 40. Diving Impale requires STR 5 in both.

Speed lists likewise differ: the configuration with Flower Frenzy at SPD 10 lists Besiege at SPD 15 and Utsusemi at SPD 40. The configuration with Flower Frenzy at SPD 20 lists Besiege at SPD 45 and Utsusemi at SPD 80. Blink Cut requires SPD 5 in both. Match the individual entries before spending points rather than combining the lowest requirements from different lists.

Budget Yen separately

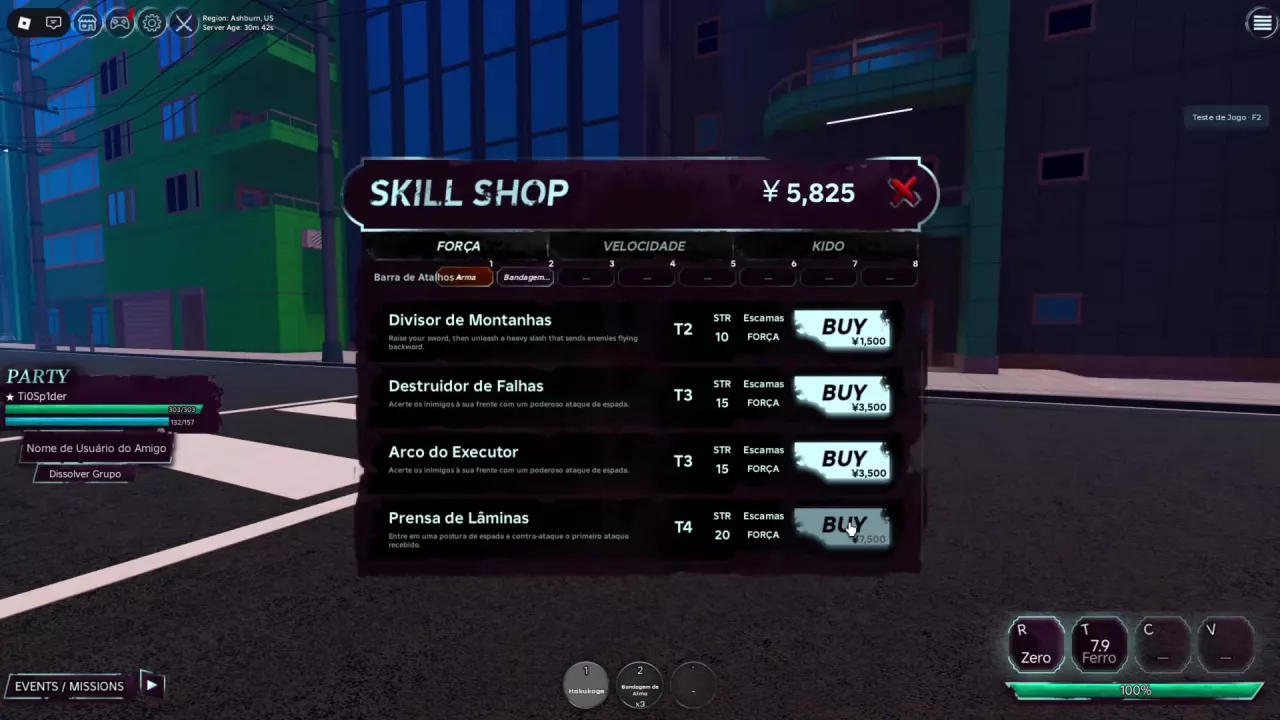
In the shop configuration with Mountain Splitter at STR 10, the listed Strength prices are 500 Yen for Diving Impale, 1,500 Yen for Mountain Splitter, 3,500 Yen each for Fault Ripper and Executioner's Arc, and 7,500 Yen for Blade Press. Buying Diving Impale and Mountain Splitter costs 2,000 Yen total. Adding Fault Ripper costs another 3,500 Yen, bringing that three-skill budget to 5,500 Yen.

Stat requirements are thresholds, not points spent each time you buy a skill. For several skills using the same stat, plan around their highest applicable requirement. Use the stat point planner to work out your allocation gap, or see PvE starter builds and buying priorities when choosing which skills deserve your budget first.

For weapon-specific release moves, use the Shikai directory or Resurrección directory.

Strength skill list showing stat requirements and individual Yen prices in the HOLLOW Skill Shop.

Buy and Equip Skills

  1. Open the radial menu and select the upper-left tree-shaped SKILLS icon. In Portuguese, look for HABILIDADES. If your interface has an upper-left crossed-swords Skills shortcut, you can use it to open the shop directly.
  2. Choose Strength, Speed or Kido, then scroll to the skill you want. Portuguese tabs use FORÇA for Strength and VELOCIDADE for Speed.
  3. Read the skill's stat requirement, scaling attribute and individual BUY price. The Yen amount at the top of the window is your balance.
  4. Select BUY once you meet the requirement and have enough Yen.
  5. Select EQUIP if the purchased skill is not already equipped. Some purchases add the skill to your hotbar immediately.
  6. Check that its name appears in a numbered hotbar slot and that its button now reads UNEQUIP.

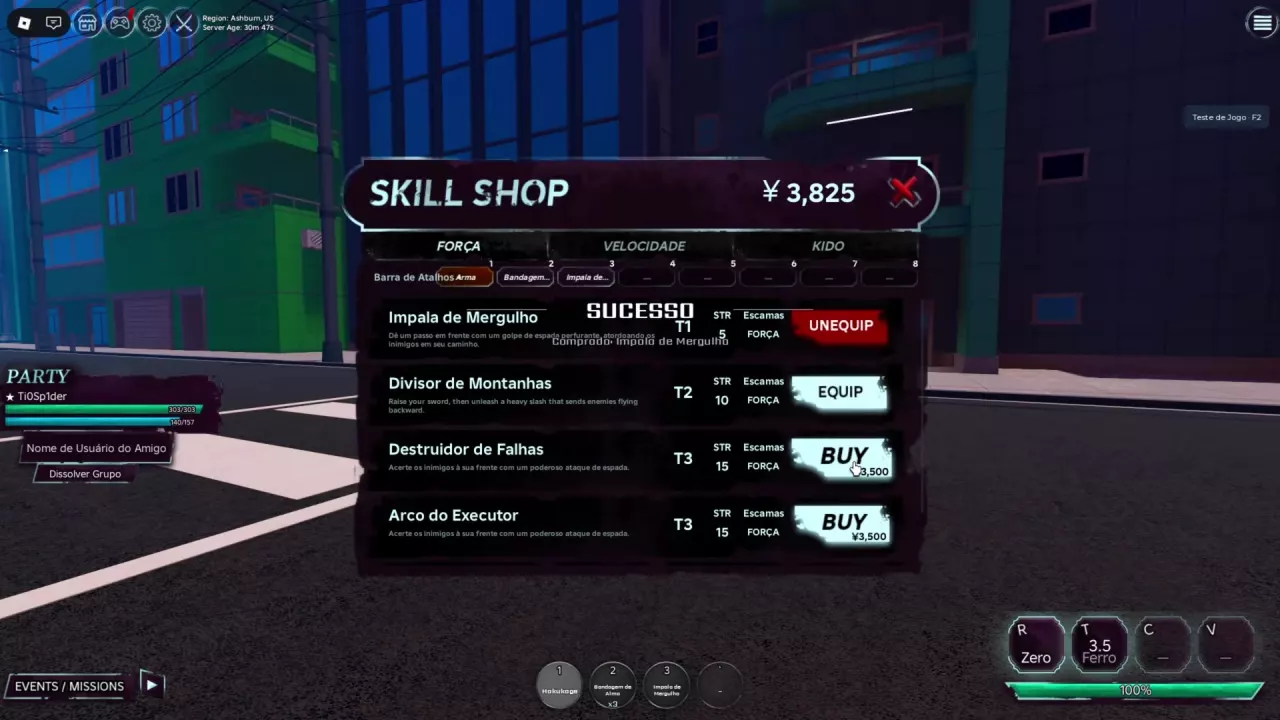
Use UNEQUIP to remove an equipped skill from the bar and EQUIP to add an owned skill. Follow the number assigned in your own hotbar: Diving Impale, for example, can occupy slot 2 or slot 3 depending on the arrangement. Its name does not imply a fixed number key.

Diving Impale equipped in slot 3, Mountain Splitter ready to equip, and other skills showing BUY buttons.

Kido Spell Entries

Kurohitsugi, labeled Hadō 90 when cast, produces a purple-black pillar-shaped attack. Raikōhō, labeled Hadō 63, produces a broad yellow lightning effect. These are useful visual cues for identifying the two spells in combat.

In the playtest setup, Byakurai can be purchased; a successful purchase displays Purchased: Byakurai.

Senju Koten Taiho and Shakkahō can be equipped in the playtest loadout. Both also appear in the playtest skill dropdown. That dropdown is a testing interface, not the normal Skill Shop purchase route.

Racial Skills Change with Your Form

Check the names beside R, T, C and V after changing form. These layouts vary, and the same key can serve a different purpose at the next stage.

Form or configuration R T C V
Early Bulky Hollow layout — — Roar Ground Smash
Early Winged Hollow layout — — Roar Dash Rush
Gillian / Menos layout Cero — — —
Adjuchas with Ground Smash Cero — Roar / Rugido Ground Smash / Golpe no Chão
Adjuchas with Dash Rush Cero Empty Roar Dash Rush
Vasto Lorde with Embestida Big Bomb Cero Roar Embestida
Vasto Lorde with Empurrada Bomba Grande Zero Rugido Empurrada
Winged form with Descenso Big Bomb Cero Roar Descenso
Arrancar layouts Cero Bala, Hierro or High-Speed Regeneration Depends on equipped abilities Depends on equipped abilities

A dash marks a slot without a named skill in that layout. The Descenso layout belongs to a winged form. Treat these as configurations to recognize, rather than a guarantee that appearance alone determines every skill.

What the abilities do

  • Cero fires a ranged energy attack and uses the blue resource bar, followed by a cooldown. It sits on R in the Gillian, Adjuchas and Arrancar layouts above, but moves to T in the Vasto Lorde layouts. Zero is its label in the Portuguese layout.
  • Roar / Rugido knocks enemies back and can produce a ring-shaped effect. It is useful for creating room around your character.
  • Ground Smash is a close-range area attack. Against nearby grouped enemies, it can be followed by Roar to push them away.
  • Dash Rush sends you forward, making it an option for closing distance.
  • Bala supplies a shooting attack in the Arrancar layout that has it.
  • Hierro / Ferro creates a small shield effect and reduces incoming damage. Use it for protection when it occupies your T slot.
  • High-Speed Regeneration provides rapid recovery in Arrancar layouts that have it. Check the T-slot label before relying on it for healing: other layouts put Hierro or Bala there instead.
  • Empurrada is a pushing attack. Embestida and Descenso are separate V-slot labels; do not treat them as interchangeable names for Empurrada or Dash Rush.

Changing to Arrancar can remove the old Roar and Dash Rush labels from C and V. For the steps that lead between forms, follow the Hollow evolution guide.

Use Bomba Grande

With the Vasto Lorde Bomba Grande / Big Bomb loadout:

  1. Check the ULTIMÁTICO meter beneath the skill bar. Wait until it reaches 100% and Bomba Grande lights up.
  2. Face your target and press R.
  3. The meter empties to 0% as blue energy gathers into a large area explosion.

Use the blast as an area attack and be ready to follow up against surviving enemies.

Locked Skills and Empty Categories

LOCKED: Compare your allocated stat with the requirement beside the skill. Having enough Yen does not satisfy a stat requirement. For example, STR 2 is below Diving Impale's STR 5 requirement; SPD 0 is below Blink Cut's SPD 5 requirement. Allocate the needed points through Stats, then return to the shop.

NO SPEED SKILLS AVAILABLE or NO KIDO SKILLS AVAILABLE: The category currently has no skills available in that interface. Empty Speed lists can occur during an early Hollow visit, and empty Kido lists can occur as Arrancar. The message alone does not tell you to change race or evolve. Check the other categories for available purchases and use your current racial abilities while planning your next upgrade.

Search the archive

HOLLOW Roblox Races: Soul Reaper or Hollow?
HOLLOW Roblox Beginner Progression and Leveling GuideHOLLOW Evolution Guide: Gillian to Vasto Lorde and ArrancarHow to Get Shikai in HOLLOW: Squad, Spirit and ReleaseHow to Unlock Partial Resurrección in HOLLOW Roblox
HOLLOW Hollow Tutorial: First Meal to The HungerHOLLOW Soul Reaper Tutorial: Riku's Starter QuestsHOLLOW Roblox Quests: Objectives, Rewards and Turn-insHow to Get Shikai in HOLLOW: Squad, Spirit and Release
HOLLOW Soul Reaper Tutorial: Riku's Starter QuestsHow to Get Shikai in HOLLOW: Squad, Spirit and Release
How to Get Shikai in HOLLOW: Squad, Spirit and ReleaseHOLLOW Shikai List, Moves and Reroll Menu
How to Unlock Partial Resurrección in HOLLOW RobloxHOLLOW Roblox Resurrections: Weapons, Moves and RerollsHOLLOW Resurrection PvE Tier List for Event Farming
HOLLOW Roblox Clans: Roll Chances, Perks and Rerolls
HOLLOW Body Types: Bulky, Crawler and Winged
HOLLOW Roblox Skills: Requirements, Prices and EquipmentHOLLOW PvE Starter Builds and Skill Buying PrioritiesHOLLOW Roblox Stats and Stat Point Planner
HOLLOW Roblox Stats and Stat Point PlannerHOLLOW PvE Starter Builds and Skill Buying Priorities
HOLLOW PvE Starter Builds and Skill Buying PrioritiesHOLLOW Roblox Accessories: Reiatsu Gloves and BraceletHOLLOW Roblox Stats and Stat Point Planner
HOLLOW Resurrection PvE Tier List for Event FarmingHOLLOW PvE Starter Builds and Skill Buying Priorities
HOLLOW Roblox Controls, Menus and PC KeybindsHOLLOW Roblox Combat Guide: Basics and M1 Fixes
HOLLOW Roblox Combat Guide: Basics and M1 FixesHOLLOW PvE Starter Builds and Skill Buying Priorities
HOLLOW Meditation Guide: How to Start and Handle WaitingHow to Get Shikai in HOLLOW: Squad, Spirit and ReleaseHow to Unlock Partial Resurrección in HOLLOW Roblox
HOLLOW Roblox Events: Find Disturbances and Clear NodesHOLLOW World Boss Rewards and Arrancar InvasionHOLLOW Roblox Party System and Event Leader Rules
How to Open the Raid Gate in HOLLOW RobloxHOLLOW Roblox Materials: Fragments, Shards and Raid Costs
HOLLOW World Boss Rewards and Arrancar InvasionHow to Get Shikai in HOLLOW: Squad, Spirit and ReleaseHow to Unlock Partial Resurrección in HOLLOW Roblox
HOLLOW Roblox Locations, NPC Markers and World TravelHow to Open the Raid Gate in HOLLOW Roblox
HOLLOW Roblox Party System and Event Leader RulesHOLLOW Roblox Events: Find Disturbances and Clear Nodes
HOLLOW Roblox Accessories: Reiatsu Gloves and Bracelet
HOLLOW Roblox Consumables: Effects, Sources and Hotbar SetupHOLLOW Roblox Combat Guide: Basics and M1 Fixes
HOLLOW Roblox Materials: Fragments, Shards and Raid CostsHow to Open the Raid Gate in HOLLOW Roblox
HOLLOW Roblox Chests: Sources, Rewards and Mass OpeningHOLLOW World Boss Rewards and Arrancar Invasion
HOLLOW Roblox Currencies: Yen and Essence
HOLLOW Roblox Customization: Character Creation and Reiatsu ColorHOLLOW Body Types: Bulky, Crawler and WingedHOLLOW Roblox Clans: Roll Chances, Perks and RerollsHOLLOW Roblox Game Passes: Prices, Features and Faster Charge
HOLLOW Roblox Game Passes: Prices, Features and Faster Charge
HOLLOW Primordial Vasto Lorde Badge Requirements
HOLLOW Roblox Stats and Stat Point PlannerHow to Open the Raid Gate in HOLLOW RobloxHOLLOW Roblox Game Passes: Prices, Features and Faster Charge